Friday 29 November 2013

NAIL ART DESIGN USING A CRAYON/PENCIL


I AM BAAAAACCCKK...!!!

I didn't post for a whole week,I wanted to so bad but I was really sick and didn't have energy to do much, but don't worry, I am back yet again with another nail art tutorial, creativity and fun. You guys thought I was done, not yet! we got plenty more to go. I am still not feeling well and was in the house for over 5 days without going anywhere but I had a meeting today so I had to step out, then I realized my nails look horrible. I was in a hurry, with only 20 minutes left, I sure wasn't going to leave the house like that. lol. I have; many times but I didn't want to. Then a tutorial was born, including photos and I am also working on a lookbook for this cold weather. Don't know what to wear for the season? Stay tuned. Lastly to make up for the time I was away, this week I am posting 3 D.I.Ys and trust me you don't want to miss it.


So for this easy, flirty, playful, fun nail art design, that I love so much, all you will need to sacrifice is 5-10 minutes of life. I am very girly and at the same time, I don't like wasting too much time doing things, I am the type to find the quickest and easiest way possible to get done with something and still look fa-fa-fabulous. So let's begin.. 

POLKA DOT NAIL ART TUTORIAL USING A CRAYON

WHAT YOU NEED:

- Different colours of nail polish.
I used, Blue, Hot Pink, Sky blue, Black, and yellow!
- White nail polish
- A crayon/pencil


You can find all these items anywhere for about 50ksh each! You don't necessarily need as many colours as I am using, but for a little fun and vavavoom feel to it, I prefer using different colours.

STEP 1: 
Apply a base on your nails to protect your nails.


STEP 2:
Apply nail polish on your nails, the order doesn't matter and preferably two coats, or one but it has to look heavy for the colour to pop.


STEP 3:
Dip your crayon/pencil into the white nail polish. If it fits, great! if it doesn't just take some from the nail polish brush. I always find it easier to just take it from the brush, dipping it in can be a mess sometimes but you get more polish. So which ever works best for you.


Quick note before we proceed. Why can't I use the striped nail art brush? Because it doesn't give you that perfect dot that you are looking for, we want it heavy and round. A stripping tool will not give you that perfection. And this is how!


STEP 3:
Apply the dots over your nail polish. You can go for small dots if you wish, like my thumb but I prefer bigger dots, they just look better to me. 


STEP 4:
Apply a top coat and you are done. Easy but beautiful.


LASTLY, wear something fabulous, do your make and you are ready to go. 10 minutes wisely used.


DON'T FORGET TO TAKE A SELFIE AND SHOW IT OFF ON FACEBOOK, TWITTER, INSTAGRAM... etc


***Please take a better selfie than mine, hahahahaha...


THANK YOU SO MUCH FOR VISITING AND ONCE AGAIN THANK YOU FOR HELPING ME HIT MY GOAL OF 2000+ VIEWS! EVERYONE FROM KENYA, USA, U.K, PHILIPPINES, ALGERIA, YOU GUYS ARE MY TOP VIEWS. THANK YOU ALL INCLUDING ALL THE OTHER COUNTRIES. 

THANK YOU SO MUCH FOR VISITING 

<3 <3 <3 


DON'T FORGET TO TELL ME WHAT YOU THINK.
FACEBOOK: R-shan Phonci Shasha
TWITTER: @Rshanphonsi
INSTAGRAM: Rshanphonsi
E-MAIL: rshanphonsi@gmail.com
FACEBOOK PAGE: Beauty4brokegirls - B4BG

OR
COMMENT BELOW

STAY FABULOUS EVERYONE!

Wednesday 20 November 2013

D.I.Y STUDDED SWEATER


" BE CHEAP, BUT DON'T LOOK CHEAP"

Studs Studs Studs! Can't get enough! They just seem to add that vavavoom to an outfit and I love to stand out. I know there is crazy all over the place studs on clothes that sometimes does not look attractive. But we are talking about the classy styled ones that can make you look like you spend too much on it. Talking about spending, this blogg is all about fashion and beauty secrets for less, how to still look like thousands when you only got hundreds in your purse. let's be real now, I am very cheap, yeah you can call me a cheap girl, it runs in the family, so I am very proud of it. lmfao and I am in love with fashion and beauty, I love to dress up, I love to look good and express myself through what I wear... Anyway what I am trying to say is, be cheap but don't look cheap. Keep it Fa-fa-fabulous!
Let's begin!


D.I.Y STUDDED SWEATER TUTORIAL + LOOK-BOOK


What we need:
Studs or spikes.
A plain sweater . Any colour would do, especially your favourite colour. that's the best.
An old floral top that you don't wear any more, or old jeans you don't wear.
Scissors


A Plain sweater you can find it almost everywhere, I bought mine at toy market for 250Ksh.
Studs! Okay, here goes my cheap story again! I just can't go buy studs in a shop, I can but I won't! Why?!? because about 10-20 studs or spikes is like 100Ksh, why do that when I can buy a studded belt for 100Ksh and have about 60+ studs on them?  :-\     ........  I love a good deal. :-D


STEP ONE:
Lay down your sweater and place the studs where you want them to be, now this is the most important step, so be careful, consider spaces, try different things. Step back and have a second and third look at it, or you may do something that you are not happy with, try removing the studs or spike and make a hole trough your sweater.


I Put together a few designs for inspiration. :-*


For this last one, to do the cross, use your old floral top, or a denim, Trust me it will look fabulous! I tried it some time back. Denims and studs always go together, it's like peanut butter and jelly or milk and cookie. Make sure you choose the right denim, yes colour does matter. After you are done placing the studs and the material, Remove studs one by one and punch them in. Then you will be done.


I chose to go with a different design for my sweater, because I like simplicity.... "sometimes".... but it still has that vavavoom flavour to it.
So now you are done pimping your sweater. Now rock it! I sure did!
So I went with this design and I am loving it.
For my look below. The sweater is 250ksh, the shirt inside is actually a shiffon top I got at 250Ksh also, Both at Toy Market, and the Skirt I got for 150ksh at Gikomba. Yes you do the math! :-D


THANK YOU SO MUCH FOR VISITING AND HELPING ME HIT MY GOAL OF 1500+ VIEWS IN TWO WEEKS. YOU GUYS ARE AWESOME! YOU ARE MOTIVATING ME TO KEEP GOING!
I LOVE YOU! YES.... YOU!


THANK YOU SO MUCH FOR VISITING 

<3 <3 <3 


DON'T FORGET TO TELL ME WHAT YOU THINK.
FACEBOOK: R-shan Phonci Shasha
TWITTER: @Rshanphonsi
INSTAGRAM: Rshanphonsi
E-MAIL: rshanphonsi@gmail.com
FACEBOOK PAGE: Beauty4brokegirls - B4BG

OR
COMMENT BELOW

STAY FABULOUS EVERYONE!


Tuesday 12 November 2013

HOW TO TURN YOUR STOCKINGS INTO A TOP


HOW TO TURN STOCKING INTO A SHIRT


Another D.I.Y coming your way, and it's my favorite thing to do. For this post we are going to learn how to turn your stockings into a fabulous top. In other words how to turn 50Ksh into more, looking like 1000ksh. It's easy, it's quick and it's the best thing you have ever seen. I usually have one of those days where i don't know what to wear, well if you do too, I got a solution for you. Turn your stocking into a top, throw on some jeans, a skirt, cute shorts and you are ready to go. all you will need for this tutorial is a pair of stockings, an old one that you don't wear or don't know what to wear it with. To achieve this awesome look, you are not going to need more than 100ksh. Remember everything that shines ain't gold. I am so excited that i am so ready to begin. So let's go!!!

TURN YOUR STOCKINGS INTO A TOP TUTORIAL
or
CROP TOP TUTORIAL

What you will need:

- Stockings
- A pair of scissors


Note: I find it always best to use stocking that have a little design, but you can also use plain black stockings. I just like to pop a little! So i need a little vavavoom to it.

STEP 1: Fold The stockings in two so that they are even and it is easier to work with.


STEP 2: Cut the bottom part of the stocking, that is where your hands will get through. 
And also the upper part between the legs, which is where your head will get through. Make sure it's not a big portion because stockings expand and you want it to sit on your shoulders not fall off.


STEP 3. YOU ARE DONE! ROCK IT! DO YOUR MAKE UP AND WEAR SOMETHING CUTE, AND YOU ARE READY TO GO. 


I really like mine because of the polka dot tights, it really looks good and it's see through, so a little cleavage, but  if you are not into cleavage and want to hide it all, go for stockings that are a bit less see through. Go tribal print, Go floral, Go goth. Anything works, and all you need is a pair of scissors. :-D


THANK YOU SO MUCH FOR VISITING 

<3 <3 <3 


DON'T FORGET TO TELL ME WHAT YOU THINK.
FACEBOOK: R-shan Phonci Shasha
TWITTER: @Rshanphonsi
INSTAGRAM: Rshanphonsi
E-MAIL: rshanphonsi@gmail.com
FACEBOOK PAGE: Beauty4brokegirls - B4BG

OR
COMMENT BELOW

STAY FABULOUS EVERYONE!

Friday 8 November 2013

STUDS, SPIKES AND DENIMS


DENIMS
STUDS
&
SPIKES

Studs and Spikes!They are everywhere, everyone is doing it, from shoes to denims, sweaters,bags, neck collars and well anything that one can possibly think of, even accessories.You can as well buy an already pimped out denim or sweater, or shoes. I personally buy the shoes because it can be a bit tricky to work with studs or spikes on shoes. But all i know is, they are my new best friends, I am hunting them down and when i see them i must get them. So here I put together a "look-book"on how to style denims, spikes and studs.

Look good on a budget. Like they say; "IT'S NOT ABOUT WHERE YOU SHOP BUT HOW YOU SHOP", So another thing i will be doing is post prices of each  and every piece of clothing i am wearing, so here we go, let's start with the first one. This look is very simple, perfect for a sunny day and doesn't require so much. what i am wearing is a denim I bought at 300ksh, The hat, I got at 350, Floral top at only 250ksh and lastly my favorite jeggings at 300Ksh. There you have it. 1200Ksh! About 10 dollars only! Less than 15$


Look Great even with Borrowed clothing. Yes borrowed, The shirt obviously is not mine ;-) 
And I have on my favorite shorts, it's a bit too short to walk around with in Nairobi, but i am a dare devil, I do whatever i want. Yes shasha does whatever Shasha wants to do. And now for the budget let's start with the shirt which is obviously not mine, so borrowed :-D , A plain White vest I got for 100Ksh, Yes i am a good shopper :-D, and the shorts at 100 Ksh and the shoes at 600Ksh. There you have it. Less than 10$ and I still look fa-fa-fabulous!


This is a very simple one, all You need is a dress, a bag and studded shoes. and you have it! I love Maxi dresses, Saves the day every time. The shoes we already know at how much i got them, The bag I have no idea because i was given and me love free stuff. :-D Who doesn't ? lol and my dress at 600Ksh. And if you closely look, I have a Gold chain I got at 450Ksh


First of all let me say, I love, love love my hair, check out the brown dye at the end. :-)


Boyfriend jeans, Boyfriend shirt, Boyfriend Everything...
:-D
This look is all me, totally me, If you love comfort like me, this is for you. Comfortable from head to toe and still look fa-fa-fabulous. And there is no specific budget here because i don't remember anything.


THANK YOU SO MUCH FOR VISITING 

<3 <3 <3 


DON'T FORGET TO TELL ME WHAT YOU THINK.
FACEBOOK: R-shan Phonci Shasha
TWITTER: @Rshanphonsi
INSTAGRAM: Rshanphonsi
E-MAIL: rshanphonsi@gmail.com
FACEBOOK PAGE: Beauty4brokegirls - B4BG

OR
COMMENT BELOW

STAY FABULOUS EVERYONE!

Wednesday 6 November 2013

NAIL ART DESIGN. TRIBAL PRINT, MICKY MOUSE AND CONVERSE.

Hello Everyone, Check out these D.I.Y nail art and learn how to do them on your own. Got something for everybody, the girly girls, the divas and the not so girly girls.


THIS IS EVERYTHING YOU WILL NEED.

- Black nail polish
- White nail polish
- Black nail Art polish
- Brown nail polish
- Colorless nail polish
White nail Art polish
- Cotton and nail polish remover, if you have shaky hands like me.


You can Find all these items anywhere, each for about 50 Ksh Only.

If you don't have a Nail Art polish, don't worry, You can use a toothpick. How?, I will post another article on how a toothpick, hair clip, tape, straw can be used if you don't have the right tools. Because i don't have most of them. lol


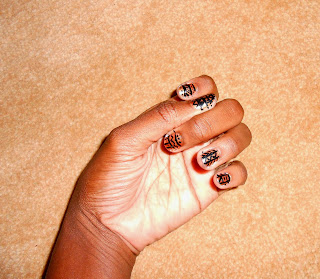
Let's start with my all time favorite. TRIBAL PRINT NAIL ART TUTORIAL


What you need.


Before applying any kind of nail polish, first apply the colorless nail polish, it's good and protects your natural nails. I don't really know much about why it's important but i read on the internet it is important.


STEP 1: Fist apply the Brown nail polish as a base.


STEP2: Then draw on lines using the Black nail polish art. Draw the lines anyhow you prefer


STEP 3: Then draw in between the lines, shapes, dotes, triangles... etc


AND THERE YOU HAVE IT.


CONVERSE NAIL ART TUTORIAL.
This next tutorial is also one of my favorites. You can't get any cooler than this.


This is for all my converse lovers!!!

Let's do this:

STEP 1: Apply Black nail polish on four of your nails, leave one blank. which ever you would like, I prefer my ring finger.


STEP 2: Add White nail polish on top of the black to make it a french manicure


STEP 3: add 3 dotes on each side of the nail then connect them.


Step 3: Tie your shoe laces!!! 


STEP 4: Let's do the last finger, fist apply on white.


Step 5: add on black on each sides of the nail to leave the white nail polish in a triangular shape.
Yes i have very shaky hands. :-D


Step LAST: Draw on a small bow. to Do that, just make a cross, and fill it in.
;-)


AND THERE WE HAVE IT. as I said, You can't get anymore cooler than this! I love it.
Thumbs up for my watch ;-D


MICKY MOUSE NAIL ART TUTORIAL.
It's quick, I'ts easy, It's cute!


STEP 1:


STEP 2: Add two more dots on each side of the dots you did before. I recommend doing each Micky mouse at a time, don't leave the dots to dry, unless you want to but it becomes a bit tricky if the heads are too close to each other.
Don't mind the all white index finger, I was trying to come up with something cool and different for it like my pinky, but It didn't work, I tried three designs, then gave up.


And there we have it. YOU ARE READY TO GO. 
:-D


STAY FASHIONABLE EVERYONE. 
AND
A BIG THANK YOU


THANK YOU SO MUCH FOR VISITING 

<3 <3 <3 


DON'T FORGET TO TELL ME WHAT YOU THINK.
FACEBOOK: R-shan Phonci Shasha
TWITTER: @Rshanphonsi
INSTAGRAM: Rshanphonsi
E-MAIL: rshanphonsi@gmail.com
FACEBOOK PAGE: Beauty4brokegirls - B4BG

OR
COMMENT BELOW

STAY FABULOUS EVERYONE!